
Bath Towel Rug Tutorial
by Ashley Howry
by Ashley Howry
I love this project not only because it's cheap and you can use what you have but also because the possibilities are endless!
And not to mention it's easy to throw in the wash!
Because let's face it...bathrooms are gross.
I like to wash my rugs a couple times a week.
I find that if you wash your big, fluffy rugs a couple of times a week they begin to look like a matted sheep.
Not cool.
I find that if you wash your big, fluffy rugs a couple of times a week they begin to look like a matted sheep.
Not cool.
Now...on to the tutorial!
Trust me...it's very easy... very forgiving...and the possibilities are endless!

SUPPLIES
*Bath Towel - you can use any size you want.
I chose a regular sized towel because I wanted a rug that covered a lot of my bathroom floor.
You definitely could also use a hand towel if you are wanting a smaller rug!
*Fabric Scraps
*Sewing Machine
INSTRUCTIONS
First start by figuring out what you want the top of your rug to look like.
I had enough fabric scraps to make long strips.
You could also just make it really simple and make four rectangles to cover the top.
Once you have figured out how you want the top to be, cut your fabric!
Make sure that the sides of your fabric hang over the long edges of the towel by about two inches.

Sew your strips together (NOT to your towel yet)
You will end up with all of your fabric sewn into a top piece.

This next step is VERY important. Trust me... I didn't do it the first time ;)
Pin the fabric layer on top of your towel.
Use lots and lots of pins.
You don't want your fabric to slide around while sewing.
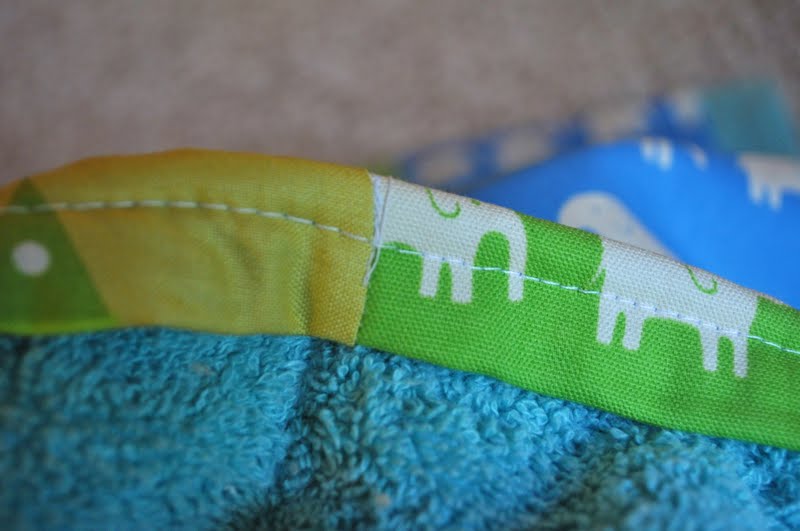
Now you will "stitch in the ditch."
Basically this means to sew along any seams that you have made.
For instance: below I stitced the line right between both fabrics.
This will secure it to your towel.

Your top piece should be attached to your towel now.
The last step is to finish up the sides!
Remember how I told you to leave two inches of fabric hanging over?
You will take those two inches and fold them over once and then fold it one last time.
This will give you a nice finished edge. Sew right along the edge.
Doing so will finish the edge of your rug!
Here's the back of the rug below.
Here's the good news... it doesnt have to be perfect.
As you can see below mine isn't.
But that's okay by me because it was free, a fun project and it serves it's purpose perfectly!

If you have any questions please ask!!!
Have a great day friends!


No comments:
Post a Comment